Lara Dashboard’s heart is its modular architecture. Adding a module to it, makes it more extendible and maintainable solution for small to enterprise level applications.
What is Module in Lara Dashboard #
In Lara Dashboard, modules can handle everything from simple tasks to complex features, anywhere within the project. For example, if you want to add an avatar feature to the User module, you can simply use our User Avatar module—it takes care of everything for you. Or, if you’re looking to integrate a complete CRM solution, you can install our Premium Lara CRM module, which seamlessly adds full CRM functionality to Lara Dashboard.
By adding modules like these, Lara Dashboard becomes highly extensible and incredibly powerful.
Modular Architecture #
Lets discuss first, how we’ve made this modular architectures, using which packages and so on.
We’ve used Laravel modules composer package to create a simple module – https://nwidart.com/laravel-modules/v6/introduction
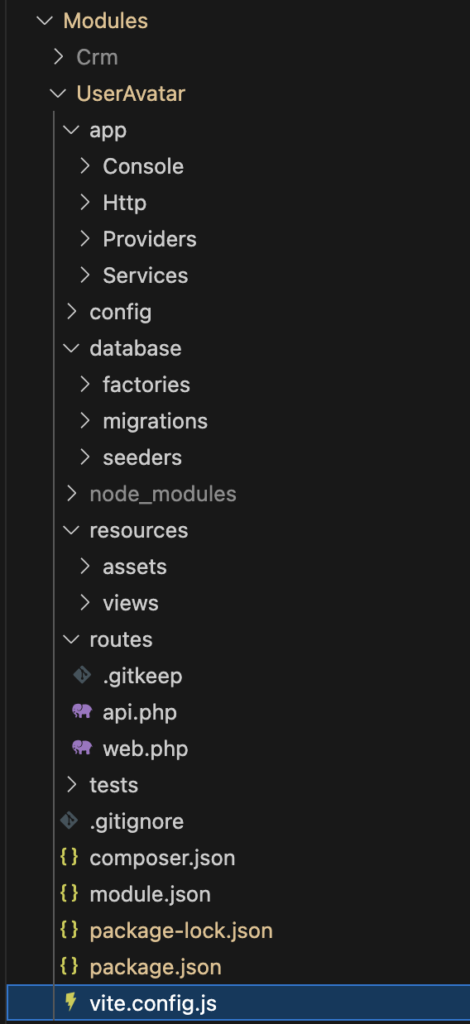
By creating a modules using Laravel modules, it will create a folder in Modules folder of your Project, then inside of that folder, it will create that module assume UserAvatar is the module name. So, inside of UserAvatar, there would be a mini laravel project setted up.
File structure would be like this –
Demo Core Module #
Here is the open source core module – User Avatar – https://github.com/laradashboard/UserAvatar which is free and open to use.
Create module command – #
Here is the basic commands listed here to create module – https://nwidart.com/laravel-modules/v6/basic-usage/creating-a-module
Lets create a UserAvatar Module, the command would be –
php artisan module:make UserAvatarEnable the module #
By default, once a module is created its already enabled, but still you can run this command to make it enable –
php artisan module:enable UserAvatarAdding functionality to UserAvatar module #
- We’ll add migration to add avatar column in users table.
- In User create and edit form add the field.
- In User list table, add the avatar image
- In backend controller on save, will save it to DB.
Migration #
Run command to add a column in migration
php artisan module:make-migration add_avatar_to_users_table UserAvatarYou’ll observ that a migration file will be generated in Modules/UserAvatar/database/migrations/ folder. Modify it as our needs.
<?php

use Illuminate\Database\Migrations\Migration;
use Illuminate\Database\Schema\Blueprint;
use Illuminate\Support\Facades\Schema;

return new class extends Migration
{
    /**
     * Run the migrations.
     */
    public function up(): void
    {
        Schema::table('users', function (Blueprint $table) {
            $table->string('avatar')->nullable()->after('email');
        });
    }

    /**
     * Reverse the migrations.
     */
    public function down(): void
    {
        Schema::table('users', function (Blueprint $table) {
            $table->dropColumn('avatar');
        });
    }
};
Run migration #
php artisan module:migrate UserAvatarAdd Field in User Forms. #
Create a folder Services, and inside of that a file called – UserAvatarHooks.php, here is that file –
<?php

namespace Modules\UserAvatar\Services;

class UserAvatarHooks
{
    public function register(): void
    {
        ld_add_filter('after_username_field', [$this, 'addAvatarField'], 10, 2);
    }

    public function addAvatarField($html = '', $user = null): string
    {
        ob_start();
        ?>
        <div>
            <label for="avatar" class="mb-2 block">Avatar</label>

            <?php if ($user && $user->avatar) { ?>
                <img src="<?php echo asset('storage/'.$user->avatar); ?>" width="50" alt="User Avatar" class="border rounded">
            <?php } ?>
        </div>

        <input type="file" class="" id="avatar" name="avatar" accept="image/*" />
        <?php
        $html .= ob_get_clean();

        return $html;
    }
}
In Modules/UserAvatar/app/Providers/UserAvatarServiceProvider.php, file, call this service in boot() method –
// Register hooks.
(new UserAvatarHooks)->register();
Complete boot() method is –
public function boot(): void
{
        $this->registerCommands();
        $this->registerCommandSchedules();
        $this->registerTranslations();
        $this->registerConfig();
        $this->registerViews();
        $this->loadMigrationsFrom(module_path($this->name, 'database/migrations'));

        // Register hooks.
        (new UserAvatarHooks)->register();
}
The method was pre generated, we’ve just added the line (new UserAvatarHooks)->register();
Now, you can able to see the field in the create/edit form.
Save in Database #
Lets use the hooks to save the column in Database in UserAvatarHooks class –
<?php

namespace Modules\UserAvatar\Services;

class UserAvatarHooks
{
    public function register(): void
    {
        ld_add_filter('after_username_field', [$this, 'addAvatarField'], 10, 2);
        ld_add_filter('user_store_before_save', [$this, 'appendAvatarInUser'], 10, 2);
        ld_add_filter('user_update_before_save', [$this, 'appendAvatarInUser'], 10, 2);
    }

    public function addAvatarField($html = '', $user = null): string
    {
        ob_start();
        ?>
        <div>
            <label for="avatar" class="mb-2 block">Avatar</label>

            <?php if ($user && $user->avatar) { ?>
                <img src="<?php echo asset('storage/'.$user->avatar); ?>" width="50" alt="User Avatar" class="border rounded">
            <?php } ?>
        </div>

        <input type="file" class="" id="avatar" name="avatar" accept="image/*" />
        <?php
        $html .= ob_get_clean();

        return $html;
    }

    public function appendAvatarInUser($user, $request): \App\Models\User
    {
        if ($request->hasFile('avatar')) {
            $file = $request->file('avatar');
            $path = $file->store('avatars', 'public');
            $user->avatar = $path;
        }

        return $user;
    }
}
Now, if you hit save, the avatar will be saved in users table.
Show User Avatar in List table #
<?php

namespace Modules\UserAvatar\Services;

class UserAvatarHooks
{
    public function register(): void
    {
        ld_add_filter('after_username_field', [$this, 'addAvatarField'], 10, 2);
        ld_add_filter('user_store_before_save', [$this, 'appendAvatarInUser'], 10, 2);
        ld_add_filter('user_update_before_save', [$this, 'appendAvatarInUser'], 10, 2);
        ld_add_filter('user_list_page_avatar_item', [$this, 'appendAvatarInUserList'], 10, 2);
    }

    public function addAvatarField($html = '', $user = null): string
    {
        ob_start();
        ?>
        <div>
            <label for="avatar" class="mb-2 block">Avatar</label>

            <?php if ($user && $user->avatar) { ?>
                <img src="<?php echo asset('storage/'.$user->avatar); ?>" width="50" alt="User Avatar" class="border rounded">
            <?php } ?>
        </div>

        <input type="file" class="" id="avatar" name="avatar" accept="image/*" />
        <?php
        $html .= ob_get_clean();

        return $html;
    }

    public function appendAvatarInUser($user, $request): \App\Models\User
    {
        if ($request->hasFile('avatar')) {
            $file = $request->file('avatar');
            $path = $file->store('avatars', 'public');
            $user->avatar = $path;
        }

        return $user;
    }

    public function appendAvatarInUserList(string $avatar, \App\Models\User $user): string
    {
        // Check if user avatar exist or not.
        if ($user->avatar) {
            $avatar = asset('storage/'.$user->avatar);
        }

        return $avatar;
    }
}
Its done, now you can see the avatar field is being added in user form and saving perfectly and also showing in user list table.
Hooks documentation #
To know which hooks, you can use, you can see this documentation – https://laradashboard.com/docs/hooks-lara-dashboard-what-why-how/ if you need more hooks you can always create a pull request at Lara Dashboard Github repo.
Summary #
This is a simple module but it demonstrate the way you could built an advanced module for your application. For more, please contact with us.


